Fall means lots of pumpkin treats! I love baking with pumpkin, so I picked up 2 cans during my last grocery trip with plans to do something with them this weekend. I had 3 overly ripe bananas I needed to use up, so I decided to try a twist on regular ole banana bread and make some pumpkin banana bread. This was so delicious!
Pumpkin Banana Bread A Hudocks to Haddocks Original Recipe
Ingredients:
3 ripe bananas
1/3 cup of butter, melted
1 cup white sugar
1 egg
1 tsp vanilla
2 tsp ground cinnamon
1 tsp baking powder
8 oz canned pumpkin
1 1/2 cups of all-purpose flour
1/2 cup walnuts, chopped
Directions:
Preheat oven to 350. Grease a 4x8 loaf pan with butter and flour.
In a large bowl, beat bananas and butter until smooth, about 1 minute.
Using a spatula or wooden spoon, mix in pumpkin and then sugar.
In a coffee mug, beat egg with vanilla and cinnamon. Add to mix and beat well, for about one minute.
Whisk together baking powder and flour, and slowly add into mix, beating with a mixer on medium speed. Beat until all flour is dissolved.
Sundays for us usually meant breakfast at a local restaurant, but as of late, we've been having breakfast at home. One of my husband's favorite breakfast meals is a skillet with hash browns, cheese, veggies, some kind of meat and eggs on the top. So I decided I could make my own. He has an appetite for 2 and I did have leftovers.
Ham & Cheese Skillet A Hudocks to Haddocks Original Recipe
Yields: 5 servings
Ingredients:
1 large potato (or 2-3 small potatoes), peeled and diced
1/8 cup of vegetable oil
2 small onion, diced
1 large green pepper, seeded and diced
1 lb ham of the bone
5 eggs
1/2 cup shredded cheese
Seasoned salt
Salt and pepper
Directions:
In a large skillet, heat oil and add in potatoes, onion and green pepper. Cover and allow to cook over medium heat until potatoes become soft and brown (around 10 minutes)
In another skillet, spray with non-stick spray and sear ham for about 4 minutes on each side. Remove from heat and cut into bite-sized pieces
In another skillet, prepare eggs (we like ours over easy or sunshine side)
I love fall cooking. Just when the temperature drops enough to enjoy a nice hot bowl of chili. I've completely switched over to ground turkey so this was my first ground turkey batch and it was excellent. I highly recommend adding the WoodChuck Amber Apple Cider, I feel like it brought out a lot of the flavors.
Fiery Chili A Hudocks to Haddocks Original Recipe
- 2 lbs ground turkey
- 1 (28 oz) can of Brook's hot chili beans in chili sauce
- 1 packet of hot chili mix
- 1 (14 oz) can of diced tomatoes with jalapeños
- 1 (14 oz) can of diced tomatoes with Italian seasonings
- 6-10 stalks of celery, diced
- 2-4 large green peppers, chopped
- 1-2 small onion, diced
- 1-3 tsp chili powder
- 2-3 tsp crushed red pepper
- 1-2 tsp cumin
- 2-3 tsp ground black pepper
- 1 bottle of your favorite beer
1. Sauté onions in a hot oiled pan, add in ground turkey and cook until browned.
2. Add all your ingredients to your crock pot and mix well. Cook on high for 4-6 hours, until all vegetables are soft.
Notes:
- I like to season it slowly. I add in maybe 1 tsp of each seasoning, let it cook for a good 2 hours, taste and then season more to taste.
- I used Woodchuck Apple Cider Amber for my beer and it gave it an amazing flavor
- To make chili mac, add ¼ cup of shells or egg noodles to bottom of bowl before adding chili.
Preheat oven to 350 degrees. In a small bowl, whisk together the flour, baking soda and cinnamon; set aside.
In a large bowl, beat the butter, sugar and brown sugar until it resembles a crumbly texture (about 1 minute). Add in the egg and vanilla and continue beating until mixture becomes smooth and creamy (about 1 minute). Add in half of the flour mixture and blend in at a low speed. Add in the remaining flour mixture and continue blending in on low. Stir in the oatmeal and chocolate chips; mix until evenly distributed throughout the mixture. Carefully mix in the banana pieces. (I just very ripe bananas and ended up smushing them a bit into the mix)
Using a tablespoon, drop the dough onto a baking sheet lined with parchment paper. Bake until the edges are lightly browned (about 15 minutes). Carefully remove from the oven and let cool on pan for 10 minutes before transferring to a cooling rack.
Preheat oven to 350. Grease bottom and sides of 2 8” round pans.
Mix all ingredients together until smooth and creamy.
Pour evenly into both pans, bake for 35-37 minutes until tester comes out clear
Allow to cool before icing
Peanut Butter Cream Cheese Frosting:
8 oz cream cheese, softened
¾ cup of peanut butter
2-3 cups of powdered sugar, sifted (I didn’t measure)
1-2 tsp of vanilla (I didn’t measure)
1-2 tsp of almond milk (I didn’t measure)
Beat cream cheese and peanut butter until creamy.
Slowly beat in powdered sugar, scraping sides, until well blended
Add in vanilla, beat well
Add in almond milk, beat well
Assembling the cake
¾ bag of Reese’s Peanut Butter Cup Miniatures, halved and chopped
Remove one cake from pan, cut off top to make flat. Flip upside down and put onto cake platter. Frost, leaving ¼ - ½ inch space around the edges.
Place 2nd cake (right side up) on top. Frost – start by putting large amount of frosting on middle and work your way to get it even across. Frost edges.
Using around 12-15 halved cups, place around border of cake.
1 ¼ cups (2 1/2 sticks) unsalted butter, plus more for pan
2 ¼ cups all-purpose flour, plus more for pan
2 teaspoons baking powder
1 ½ teaspoons salt
2 cups packed light-brown sugar
½ cup granulated sugar
3 large eggs
3 teaspoons pure vanilla extract
1 cup chopped walnuts (about 4 ounces)
1 ½ cups milk chocolate heath toffee bits
¾ cup butterscotch chips
Directions:
Preheat oven to 350 degrees. Butter a 9-by-13-inch baking pan. Line pan with foil; butter and flour.
In a saucepan over medium heat, cook the butter until it turns golden brown; remove from heat, and let cool. Whisk together flour, baking powder, and salt.
In the bowl of an electric mixer, combine browned butter and both sugars; stir with a wooden spoon until combined. In a coffee mug, beat eggs and vanilla. Add to mix and beat on medium-high speed until light and fluffy, about 3 minutes. Add flour mixture and beat until combined. Stire in walnuts, toffee bits and butterscotch chips. Mix until thoroughly combined, and pour into prepared pan.
Bake until a cake tester inserted in the center comes out clean, 35 to 40 minutes. Transfer to a wire rack to cool completely before turning out of pan onto a cutting board. Peel off parchment paper; cut blondies into 3-inch squares. Blondies can be stored in an airtight container at room temperature up to 3 days.
Notes:
I went to go make this recipe and ended up not having enough butter, so I used 3 sticks of margarine. After about 25-30 minutes of boiling, it was not turning brown so I gave up.
I added ½ tsp more of baking powder and ½ tsp more of vanilla.
The original recipe calls for you to add in the eggs and then the vanilla. I prefer to beat my eggs with the vanilla before adding them.
The original recipe calls for 1 cup of toffee bits and 1 cup of chocolate chips, I switched it up for a different flavor. Next time, I will add 1 cup of coconut too!
This mixture was thick, so I was not able to pour it into my pan. Instead, I “scooped” it up with a spatula and spread it onto the pan.
Mine baked for around 45 minutes. I let it cool in the pan for about 20 minutes and then pulled the foil up to remove it from the pan. I placed it on the counter and let it cool another 30 minutes, or so, before cutting into it.
I have recently starting making my own pizza. It's been amazing, but I've been cheating with a Boboli pizza crust. I decided it was time to concur my fear of yeast and give homemade pizza dough a try. It was delicious, despite the thickness of it!
Whole Wheat Pizza Dough
Adapted from Allrecipes.com
Ingredients:
1 teaspoon white sugar
1 1/2 cups warm water (110 degrees F/45 degrees C)
1 tablespoon active dry yeast
1 tablespoon olive oil
1 teaspoon salt
2 cups whole wheat flour
1 1/2 cups all-purpose flour
Directions:
In a large bowl, dissolve sugar in warm water. Sprinkle yeast over the top, and let stand for about 10 minutes, until foamy.
Stir the olive oil and salt into the yeast mixture, then mix in the whole wheat flour and 1 cup of the all-purpose flour until dough starts to come together. Tip dough out onto a surface floured with the remaining all-purpose flour, and knead until all of the flour has been absorbed, and the ball of dough becomes smooth, about 10 minutes. Place dough in an oiled bowl, and turn to coat the surface. Cover loosely with a towel, and let stand in a warm place until doubled in size, about 1 hour.
When the dough is doubled, tip the dough out onto a lightly floured surface, and divide into 2 pieces for 2 thin crust, or leave whole to make one thick crust. Form into a tight ball. Let rise for about 45 minutes, until doubled.
Preheat the oven to 425 degrees F (220 degrees C). Roll a ball of dough with a rolling pin until it will not stretch any further. Then, drape it over both of your fists, and gently pull the edges outward, while rotating the crust. When the circle has reached the desired size, place on a well oiled pizza pan. Top pizza with your favorite toppings, such as sauce, cheese, meats, or vegetables.
Bake for 16 to 20 minutes (depending on thickness) in the preheated oven, until the crust is crisp and golden at the edges, and cheese is melted on the top.
Notes:
·I used a rapid rise yeast so it only had to sit over about 10 minutes with the towel over it.
·I had a hard time shaping it, so I left it as one large pizza crust. It was very thick, like double dough. Next time I will cut in half or just half the recipe to make enough for 1 thin crust.
·Because I had a hard time forming it, when I finally got it, I placed it on a pizza board and covered it with a towel for a couple hours before I made it.
·Once I was ready to make my pizza, I flipped it over and “folded” over a bit of the dough to form a crust.
·Mine ended up cooking for closer to 25 minutes.
Topping your Pizza:
Ingredients:
2-4 tbsp of olive oil
1 tsp basil
1 tsp oregano
1 tsp garlic salt
1 tsp crushed red pepper
1 link of hot turkey sausage, casing removed
8 oz of turkey pepperoni
1 pound of part-skim mozzarella cheese, shredded
Directions:
Brush olive oil along the crust of your dough. I actually brush it over the entire dough. Top with basil, oregano, crushed red pepper and garlic salt.
Top with 4 oz of pizza sauce, spread evenly
Add 1 layer of turkey pepperoni
Top with ½ the cheese you are using
Remove casing from sausage, break into small pieces and place on pizza
Add remaining cheese and top with pepperoni
Notes:
I don’t measure any of my ingredients, I just eye ball it.
This pizza is moderately spicy. To add more kick, add additional layer of crushed red pepper to the top of the pizza. To lessen spice, use regular turkey sausage and omit crushed red pepper.
WEIGHT WATCHERS POINTS VALUE: I cut this into ~20 squares. 1 square = 3 points
I've been obsessed with carnitas since the first time I've ever tried them. I never thought about making them myself though. Typically, I would just go to the Mexican grocer and pick up some already prepared. I decided it was time to learn how to do this myself. I would say these were awesome for my first time, but there is definitely room for improvement.
Carnitas in the Slow Cooker A Hudocks to Haddocks Original Recipe
3.5 lb pork shoulder
6 oz goya green chilies
1 tbsp. cumin
3/4 cup of chicken broth
6 packets of Sazon
Directions:
Wash defrosted pork shoulder and place in crockpot
Cover in green chilies. Add cumin and chicken broth.
Cook on low for 8 hours, flipping shoulder over halfway through cooking time.
Remove pork shoulder from crockpot, shred with 2 forks, add sazon and mix well
I put this in the crockpot and then was running errands for several hours, so I came home after 6 hours of cooking to look at it and see that it needed to be flipped. I flipped it and put it on high for those last 2 hours, so I figured 8 hours, flipping midway, should do.
I wish I has more time for this dish, since I would have liked to add the sazon and throw it back in the crockpot for another 30 min - 1 hour for it to cook in the flavoring better.
I find that foods on sticks always go over well with our group of friends. We're all trying to eating healthier though so I knew I had to go healthy with my dessert choice. I found this Weight Watchers recipe and gave it a try!
Strawberry Shortcake on a stick! Adapted from Weight WatchersCookbook
1 pound of fresh strawberries, halved
12 shortcakes, quarted
1/4 cup of chocolate chips
1 tsp butter
Directions:
Alternate shortcake and strawberries on a skewer
Place on a wax paper lined baking sheet
Melt chocolate chips and butter in a double boiler or in the midcrowave
Another one from LaaLoosh! It did not look very pretty, so I had to explain to people what it was so they were not scared. It ended up being a huge hit! I served this with a veggie platter, tortilla chips and crackers.
1/3 cup crumbled fat free feta cheese ( didn’t really measure, I used about ½ container)
2 tsp fresh lemon juice
Sea salt and pepper to taste
Directions:
1.In a medium skillet, heat 1 tbsp of olive oil. Once hot, add spinach and toss for a few minutes or until the leaves just begin to wilt.
2.Place spinach, green onions, cream cheese, garlic, sour cream, feta cheese, crushed red pepper, chives, lemon juice in a blender; puree. Taste dip and add salt and pepper to taste. Empty dip into a serving bow and dig in!
Entire recipe makes 8 servings
Serving size is 3 tbsp
Each serving = 1 Point Total
I was so happy to find this blog with all of its glorious Weight Watchers recipes. I made this dip for a jewelry party I hosted. I served it with tortilla chips, crackers and veggies.
Ingredients:
- 16 oz boneless, skinless chicken breasts
- 1 tsp salt
- 1/2 tsp pepper
- 1 tsp garlic powder
- 1 tsp onion powder
- 8-oz. fat-free cream cheese, softened
- 1/2 cup fat free sour cream (I added another tablespoon)
- 1/2 cup hot sauce (I use Valentino’s)
- 2 tbsp low calorie butter (I used country crock light spread)
- 1/2 packet of dry ranch dressing mix
Directions:
1. Preheat oven to 325 degrees.
2.Rub chicken breasts with salt, pepper, garlic powder and onion powder. Spray a skillet with non-fat cooking spray, and set on med/high heat. Put in chicken breasts, and cook until brown on both sides and meat is cooked through. Set aside. Once meat is cool, cut it up into bite sized shredded chunks.
3.In a large bowl, stir cream cheese and butter until smooth. Add in chicken and other remaining ingredients, and mix until thoroughly combined. Move to corningware.
4.Bake in the oven for about 20-25 minutes, or until dip has heated all the way through.
Entire recipe makes 12 servings
Serving size is approx 1/2 cup
Each serving = 2 Point Total
If you are looking for a great treat for your next party, look no further. These brownies were AH-MAZING! They disappeared before I could even get a good pic!
Peanut Butter Truffle Brownies
Adapted from Betty Crocker Website
Brownie Base
I box brownie mix (I used Pillsbury Milk Chocolate Brownie Mix
Water, vegetable oil and eggs called for on brownie mix box
Filling
½ cup butter, softened
½ cup creamy peanut butter
2 cups powdered sugar
2 teaspoons milk
Topping
1 cup milk chocolate chips
¼ cup butter
Heat oven to 350°F. Grease bottom only of 13×9-inch pan with cooking spray or shortening.
In medium bowl, stir brownie mix, water, oil and eggs until well blended. Spread in pan. Bake 28 to 30 minutes or until toothpick inserted 2 inches from side of pan comes out almost clean. Cool completely, about 1 hour.
In medium bowl, beat filling ingredients with electric mixer on medium speed until smooth. Spread mixture evenly over brownie base.
In small microwavable bowl, microwave topping ingredients uncovered on High 30 to 60 seconds; stir until smooth. Cool 10 minutes; spread over filling. Refrigerate about 30 minutes or until set. Store covered in refrigerator.
I am not a mayo person so foods like pasta salad, chicken salad, potato salad, etc. never enter my mouth. This never stops me from making it for others though. I was recommended this recipe for someone who does not like pasta salad. I tweaked it a bit (cut down on the mayo) so I actually ate it and enjoyed it! I hope you do too.
Sometimes I get the spur of the moment urge to bake. All I had in the house yesterday was some cake mixes, so I decided to make a carrot cake. What a great Sunday night treat to enjoy while watching True Blood!
Carrot Cake
1 carrot cake mix ( I use Duncan Hines Moist Deluxe Decadent Carrot Cake Mix)
1 cup of water
1/2 cup of oil
3 eggs
1 small bag of chopped walnuts
Pour ingredients in a medium bowl. (I whisk the eggs together in a small cup or bowl before adding in)
Beat ingredients together with a hand mixer for 2 minutes
Add in chopped walnuts
Pour into 13x9 greased bottom baking pan
Bake at 350 for 28 minutes
Allow cake to cool before frosting
Vanilla Frosting
3 oz cream cheese (softened)
a little more than a half stick of butter (softened)
1/2 bag of powdered sugar (I don't measure, I just slowly add in until the consistency and quantity is just right)
1-4 tbsp cream or 2% milk
Beat together cream cheese & butter
Slowly add (or sift in) sifted powdered sugar
While you are slowly adding in your powdered sugar, add your cream/milk as needed.
I had my little cousin over this weekend and decided to have a nice BBQ yesterday with the 3 of us. I had some chicken wings that I decided to make a marinade for myself. The result = soooo delicious!
Buffalo Wings (Caution: may be hot for some!)
7 chicken wings
½ to ¾ cup of your favorite hot sauce (I did not measure)
1-2 tsp ground black pepper
1-2 tsp salt
1-2 tsp chili powder
1-2 tsp crushed red pepper
1-2 tsp BBQ seasoning
1. Add all ingredients together in a Pyrex bowl. Cover, shake to mix well and refrigerate for at least 45 minutes prior to cooking.
2. Grill to your desired level.
3. Enjoy!
I had a salmon fillet at home with no plans on what to make with it. I came across Oishii's recipe for beer battered salmon tacos with zesty white sauce. This sounds delicious, so I decided to give it a try.
It’s very easy and relatively fast (about 25 minutes) to make. It was pretty good, it would have been better if I liked Salmon. I’ve come to the conclusion I only liked smoked salmon, not salmon fillets. The sauce yielded quite a bit and not knowing what I could do with the leftovers, I just threw it out (something I hate to do.) So if you are interested in the sauce, I recommend cutting the recipe in half.
Here is my version of the recipe…
Beer Battered Salmon Tacos with Zesty White Sauce
For the White Sauce:
• 1/2 cup plain yogurt
• 1/2 cup mayo
• Handful of chopped cilantro
• 2 tbsp lemon juice
• 1/2 teaspoon dried oregano*
• 1/2 teaspoon ground cumin*
• 1/2 teaspoon chili powder*
• freshly ground black pepper
* I did not measure
For the Beer-Batter:
• 1 cup all purpose flour
• 1 teaspoon baking powder
• 1 teaspoon salt
• 1 egg
• 1 cup beer ( I used Coors Light)
Making the Tacos:
About 6 oz of salmon fillets, skinned and cut into your desired size pieces
6 whole wheat flour tortillas
Vegetable oil and/or olive oil for frying (I use olive oil to fry tortillas)
• In a medium bowl, mix together yogurt and mayonnaise. Gradually stir in fresh lime juice until consistency thins. Season with oregano, cumin, chili powder, and black pepper. Add chopped cilantro, mix, set aside.
• In a large bowl, combine flour, baking powder, and salt. In another small bowl blend egg and then blend in beer. Quickly stir into the flour mixture (it’s okay if it’s a little lumpy).
• Heat oil in deep frying pan until hot.
• Dust salmon pieces lightly with flour. Dip into beer batter, and fry until crisp and golden brown. Drain on paper towels.
• Heat tortillas in a hot oiled pan, until slightly crispy on each side. Drain on paper towels.
• To serve, add salmon fillets, whatever toppings you please and drizzle with white sauce. Enjoy!
This made 6 servings. Another Weight Watchers Indulgence: 1 taco = 7 points
So all of the ladies on my cooking forum always rave about this creamy taco mac. I figured I would give it a whirl to see what the hoopla was all about. It pretty much is a grown-up, no-box version of hamburger helper and it was pretty delicious! Next time I will try it with fat free cream cheese and fat free sour cream though.
1 ¼ pound of ground turkey
1 can (14.25 oz) Italian style diced petit tomatoes
2 packets of sazon (or you can use 1 packet of taco seasoning)
3 oz of cream cheese
1./2 cup of sour cream
8 oz of whole grain shells
1 cup of reserved pasta water
Salt & pepper
Fat-free mild cheddar shredded cheese
In a medium pot, bring water to boil for pasta. Cook to al dente
In at least a 10” skillet, brown ground turkey until no longer pink. Add in tomatoes and sazon, mix well. Reduce heat and simmer for 3 minutes.
Add in cream cheese, sour cream, cooked pasta and reserved pasta water. Mix well until all cheeses (especially cream cheese) are melted.
Reduce heat and simmer for 5-10 minutes or until it reaches your desired thickness. Add salt and pepper to taste
Serve and top with shredded cheese. Mix cheese well in your bowl.
Ummmmm I am *still* not quite sure how I have never heard of Bakerella until now! I have been marveling over her site for the past two days now. I pretty much want to try everything!! I think I will start out with some cake pops for my upcoming jewelry party. So stand by for a blog update!
In the meantime I am sure you can occupy your time by looking at every. single. recipe on her site!
I saw this recipe and saved it because I knew I had to make these! I saved them for a party since I didn't want these bad boys in my house. I ended up making them for my 90's bash and called them chocolate salty balls. They were heavenly and disappeared quickly leaving my Vanilla Ice-d cupcakes barely touched.
1. Take 6 of the cookies, finely crush them, and set aside (This can be done in a food processor. I used a magic bullet and it worked okay)
2. Take the rest of the cookies and finely crush them (again I tried the magic bullet and its didn't work so well with this many, so I ended up putting them in a ziploc bag and going over it with a pin roller)
3. Mix the crushed cookies and the cream cheese until well blended. Shape into 1-inch balls. After this, stick them in the freezer for a little bit so that they harden. It makes it easier when it comes to dipping.
4. Melt the chocolate over a double boiler ( I don't have one, so I just boiled water and then put a heat safe bowl on top) and dip the balls in the melted chocolate. Place the balls on a wax-covered baking sheet and then sprinkle with the crumbs that were set aside.
I like fish. A lot. Though I have never in my life had a fish taco! I guess I never really knew what they were exactly. Maybe I thought it was some weird fish I wouldn’t like or… something. Either way, I’ve never tried them. So I decided to see what all of these were about and started looking at recipes to make some myself. Tilapia is our fish of choice so I went from them and just kind of improvised a recipe. They were awesome! Even the hubster said he was impressed (he’s never had them either.) I think we have a winner.
Fish Tacos
4 tilapia fish filets
1 whole lemon
1 whole lime
Lemon Pepper Seasoning Salt
½ cup cilantro
Toppings:
Cheese
Sour cream
Salsa
Season fish with lemon pepper seasoning on both sides. Place fish on a foil lined baking sheets. Squeeze 1/3 the juice from lemon and ½ the juice from the lime onto filets. Bake thawed at 425 for 15 minutes. Flip filets midway through baking, squeezing 1/3 of the lemon & lime juices on top of the filets.
In a bowl, tear apart cilantro and squeeze remaining 1/3 of the lime and lemon juices onto cilantro.
Meanwhile, heat oil in a skillet and heat corn and/or flour tortillas.
Remove fish from oven and place in bowl with cilantro mix. Mix together, breaking apart the fish into pieces (it should pretty much fall apart).
Create tacos topping with cheese, sour cream, salsa and/or anything else your heart desires
You know I have to assign this Weight Watchers points. So 3 corn tortillas with 4 oz of fish mix topped with a total of 1/8 cup of Mexican shredded cheese, 1 tbsp of sour cream and 3 tbsp of salsa = 6.5 points
I had a hankering for artichokes yesterday and I already had taken chicken out for dinner so I went on the hunt for a new recipe. This one comes from Living Insanity's Blog . It was delicious but in the future, I will probably chop the artichokes up more and only use ½ - ¾ of the can instead of the full can.
·3 skinless, boneless chicken breast (I used 1.5 lbs of chicken tenders)
·1 teaspoon salt
·1 teaspoon freshly ground black pepper
·2 tablespoons butter
·1/2 cup all-purpose flour
·1/2 cup dry white wine
·1/2 cup plus 2 tablespoons fat-free, less-sodium chicken broth
·1 can quartered artichoke hearts, drained
·4 oz. cream cheese
·1 1/2 tablespoons flour
·1 tablespoon fresh lemon juice
1. Sprinkle chicken breasts evenly with salt and freshly ground black pepper.
2. Melt butter in a large nonstick skillet over medium-high heat. Place flour in a shallow dish. Dredge chicken in flour. Add chicken to pan; cook 3 minutes on each side or until done. Remove chicken from pan; keep warm.
3. Add wine, broth, garlic and artichokes to pan, scraping pan to loosen browned bits; cook 2 minutes. Add cream cheese and stir until melted. If sauce needs to thicken, mix 2 tablespoons of broth with 1 1/2 tablespoons flour (mix together in a cup and then add) and add to sauce.
4. Remove from heat; stir in juice. Serve sauce over chicken & pasta
• 12 ears corn, husk and silk removed
• 1 large bunch asparagus spears, trimmed and cut into 1-inch pieces
• 5 peppers (3 red & 2 green)
• 3 tbsp minced garlic
• 2 tablespoons olive oil
• 3 tablespoons balsamic vinegar
• 2 tsp basil
• 1 tsp garlic salt
• salt and black pepper to taste
1. Boil corn until done (about 10-15 minutes). Allow to cool, cut kernels off
2. Fill a large saucepan with lightly salted water and bring to a boil over high heat. Add asparagus and cook until just tender, about 1 minute. Drain in a colander and rinse immediately under cold, running water until well chilled. Set aside.
3. In a medium saucepan heat olive oil. Add in peppers until roasted and soft.
4. Combine the corn, asparagus, roasted peppers, garlic, basil, garlic salt, and balsamic vinegar in a large bowl; season with salt and pepper to taste. Serve chilled.
For the first time in our 6 year long relationship, we had no plans this year since we could not join our friends out of town. I decided to invite the family over for a cookout on the 3rd. With the patio fiasco not being complete until days before, I was quickly regretting ever having mentioned this BBQ. But in my style, I got it all done and it was a great success. I tried a few new recipes that I needed to post though.
American Flag Fruit Parfait Adapted from Taste of Home
2 ½ packages of cream cheese, softened
¾ cup of white sugar
2 tsp vanilla extract
2 ½ cups of whipping cream
2 quarts of strawberries, halved
1 quart of blue berries
In a large bowl, beat cream cheese, sugar and vanilla until fluffy. Beat in whipped cream. Place a third of the mixture in a 4-qt. bowl. Reserve 20 strawberry halves and 1/2 cup blueberries for garnish.
Layer half of the remaining strawberries and blueberries over cream mixture. Top with another third of the cream mixture and the remaining berries. Spread the remaining cream mixture on top. Use the reserved strawberries and blueberries to make a "flag" on top.
Makes about18-20 servings.
Pretzel SparklersAdapted from Taste of Home
1 bag of Ghirardelli white chocolate baking chips
1 bag of pretzel rods
1 container of red, white & blue sprinkles
Line a platter with wax paper or foil (shiny side down).
In a small, microwave-safe bowl, pour half the bag of chocolate. Microwave in 30 second increments, stirring after each increment. Repeat until chocolate is melted. Be careful not to burn chocolate. Typically melting time is 1 minute - 1 minute and 20 seconds.
Using a spoon, spoon chocolate onto pretzel rod and spread all around and across¾ of the rod.
Place on top of foil/wax paper.
Repeat with second bag of chocolate. While this chocolate is melting, toss sprinkles onto the already made pretzels.
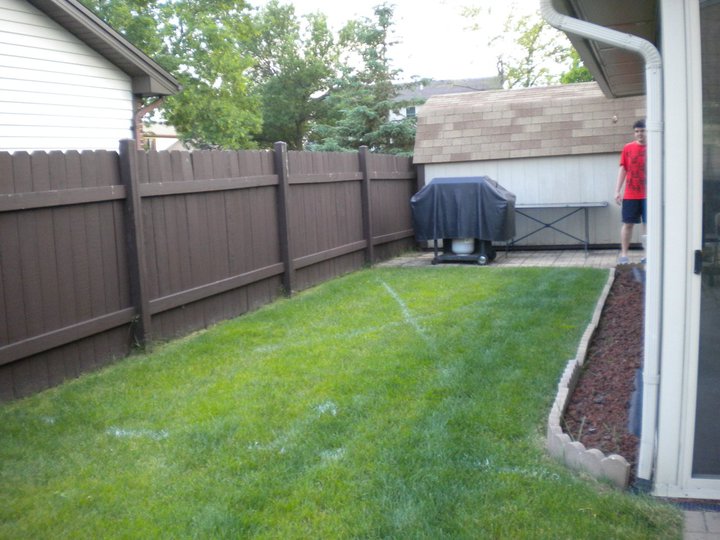
Over 4 months ago, we decided to extend our patio because we did not have a place big enough to put our patio table on. We would put it on the grass but when it rained, the chairs would sink. It was not cute. On top of all of this, we had a small patio that buckled over the winter. So we decided to replace those patio blocks and extend the whole thing. We knew we wanted pavers, it was just a matter of procuring a landscaper and being able to afford it.
BEFORE: Area of grass and buckled pavers
This turned into the most stressful project we've ever done.
My mom is a bartender and her bar patron and mainly labor-type workers. She made mention of our wanting to extend the patio and a customer said he was getting rid of his deck, the wood was new and he would design and install a deck for us. We were very excited because all we were going to have to pay was labor. 3 days of phone tag later, he shows up on our agreed day an hour late. I had to work a wedding that day, so I was already nervous. They were there for a while thinking of different designs. He told me he would call me back later that day with a price.
3 weeks later, he gives MY MOM (not even me) a sketch of his design. It's *nothing* what we discussed, he blocked off the whole thing where there is no access to the grass (hello! landscapers need to get across there to mow the lawn!) and all of a sudden the wood is no longer free because he does not have enough. So we need to buy the material & pay him.. and, oh wait!, the price of lumber is going up so that quote is no longer good.
Veto! We decide a deck is not even what we wanted and would not be ideal for the space. Next...
I contact 4 concrete contractors and 3 landscapers for paver pricing. 1 concrete guy kept rescheduling to the point where I told him to forget it and the other 3 completely blew me off. 1 paver quote was redic, the other was reasonable and our landscaper's never called us back.
Come to find out my cousin's husband knows how to do this. we hire him. He tells us 2 weeks. We have an idea to hire the landscapers to prep the area - remove existing pavers/dig down 6 inches and remove sod & dig down 6 inches and take it away. $1000 quote later I told them they were out of their minds. My cousin insures us he can do this.
We buy the material at Menard's. Go in one day and get the wrong information from an idiot and a redic quote for material that leaves us thinking we cannot afford this project. Go back, complain, get the correct help and free delivery. Delivery comes, missing 2 skids. The 10 skids still took up all the room in our garage though!
It took 4 more b*tchy phone calls and 4 more days to get the remaining pavers that we needed. And then we didn't even have enough sand and paver base. 2 car load trips of 1000+ pounds later... we have all the material. Oh! But we have 10 bags of sand left and 500 pavers leftover. *sigh*
We had to "hire" a friend of ours one day to come and help him, rent a sod cutter and borrow a few tools from a friend. Add in a BUTTLOAD of rain and it took over 3 weeks to prep the area. We had to find creative ways to reuse the dirt (we're leveling out the 'dip' along our fence in the yard and installing a retaining wall in the front). We sat looking at a mess for a while:
He basically lived with us for 5 weeks straight while he finished this project. Most of the delay was from the torrential rainfalls we had during those weeks which resulted in us having to rent a water pump 7 times and losing several days while things dried. He finished last week Thursday. 2 days before my 4th BBQ. I was able to get everything done. I was down to the wire and I can barely walk but it's done.
Although, this was the most stressful project ever we are very pleased with the way it turned out. We loveour new patio and are sure to get a lot of use out of it!